|
Prior to uploading your CSV file you will need to create it, or modify an existing one. To do this you will need a program like OpenOffice or Microsoft’s Excel. We recommend OpenOffice, since it makes it easy to define the delimiter and field enclosure characters. OpenOffice is a free open source program, and can be downloaded from here: http://www.openoffice.org. We do not offer support for OpenOffice or Microsoft’s Excel, since these programs have their own support systems in place. This page shows you how to make a CSV that will add products to your shopping cart. You must use OpenOffice for this. If you use Excel, the commas and quotation marks in your long descriptions will competely hash your data. It’s okay to use Excel for uploads that do not include the long description. |
|
You can create multiple products within a CSV file and then import them into the shopping cart. This method gives you the ability to quickly populate your shopping cart with products instead of using the individual item importing form the STN database. To do this you will need to use a spread sheet program like OpenOffice or Microsoft Excel. You will also need to have the images for the products processed and ready to go. We recommend creating the large image to be jpeg, 72 dpi and 500×500 pixels. The thumbnail images are generally jpeg, 72 dpi and 90×90 pixels. Your site could be using a different thumbnail size decided upon during the design process in which case you will want to those dimensions. Another item you will need is an FTP account set up for uploading all of your images to your site and an FTP client program. We recommend FileZilla (http://filezilla-project.org/) which is an open source FTP client program. To get your FTP login information you will need to contact Specialty Toys Network support (support@stoysnet.com)and they will create that account for you.
Using OpenOffice to create the CSV file we will want to define what fields we are using to create the new products. I’ve created a CSV file for you to download so that you can start with csv_example has the most common fields used to create a CSV file to upload. Going over the file you’ll see in the first row are the field titles which tells the system that all of the values in this column are associate with this field. |
|
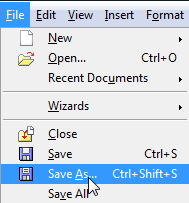
Once you have your spread sheet filled out with the necessary data you will want to save it as a CSV file and define the delimiters and field separators. To do this select “Save As…” from the File menu item in OpenOffice. |
|
You will now get a dialog box asking you for the file name and file type and you will want to select “edit filter settings” then select “Save”.  |
|
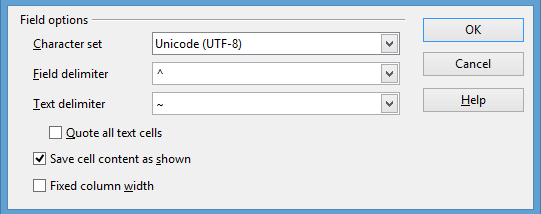
Next you will have the option to change the Field delimiter and text delimiter to ^ and ~. The reason you will want to do this is to prevent problems where a product description with commas or a string of comma separated values will give the system information to skip to the next value. The characters ^ and ~ are less likely to be used and therefore are better choices to use for delimiters. For more information click here>>  |
|
|
|
|
|


