Store Locator Overview
The Store Locator component allows you to input a list of stores and display them in a Google map to the customers. This component is only available to our manufacturer’s/representative sites that are considered B2C systems.
Stores can be added in 2 ways:
-
By importing a CSV file with the store’s information
-
By manually entering the information on the form provided by the component.
Stores’ Latitudes and Longitudes
Stores will not display on the map unless they have latitude AND longitude values.
There are 3 ways to add those values:
1. The “Get Stores Lat & Long” button will automatically send Google the address for ALL the stores in the system and results found by Google will be added to each store’s information.
2. Press ‘Find Latitude and Longitude Values’ button while editing a store’s information. It will send the store address to Google to get its coordinates. If Google cannot find the address, you will see a warning. Double check the address and fix any errors that may exist and try again.
3. Input the latitude and longitude values manually on the form. It’s a last resort if the other two methods fail.


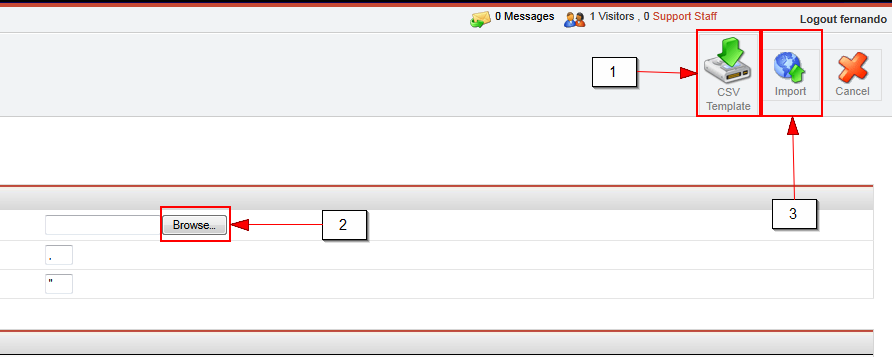
Importing Stores Through a CSV
Importing store information with a CSV file is very simple. After clicking the ‘Import Stores’ button on the toolbar menu you will be taken to the upload page.
 1 – You can download a template to help you get started with the ‘CSV Template’ button.
2 – After downloading the file just open it and start filling it out with your information. When you are done click the Browse button and select the file you want to upload.
3 – Press the ‘Import’ button on the toolbar menu and that will upload your store(s) information to the system.
Note: If a store being uploaded has the same store name AND address as another store the system will update that store with the newly uploaded information and it WILL NOT create a duplicate store. It is NOT possible to create 2 stores with the SAME store name AND address.
Exporting Store’s Information
You can export the information on the system by clicking the ‘Export Store’ button on the toolbar. This will prompt you to download a CSV file with all the stores in the system.
Adding/Editing a Store
The Add and the Edit page are basically the same. Fill out the data and press save to add or update a store.
Note: You will NOT be able to Add a store without a store name or add/update a store with the same store name AND address 1 as another store.
Store Locator Front End
Once a store information has been entered it will be visible on the Google maps interface on the front-end.
When you hover over the store icon you’ll get a pop up with the store information, a link to get directions to that store and also a link to the store’s website.

The customer can mark his location by inputting his address on the Address text box.
If the customer presses the ‘Go’ button, it will add his location to the map as a red circle.
If the customer presses the ‘Here’ button, the map will then only display the closest stores on the map. It will center the map in a position where the customer can see all the stores displayed in the map.
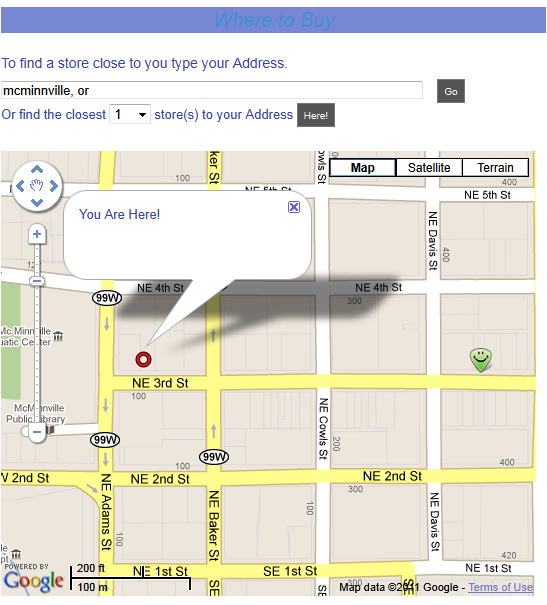
If the map is zoomed out and the store icons start overlapping, the map will change the icons into a ‘cluster icon’ that will display the number of stores in that location. If you click on that icon it will zoom in closer until the stores are separated into their own store icon.