Do you need to change your store hours?
Most people can edit the store hours that appear on their site by opening their Contact Editor and changing the hours there.
Updating your Hours in the Contact Editor
To change your hours from the Contact Editor, follow these steps.
-
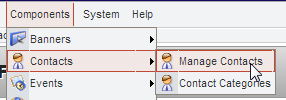
Open up the Contact Editor
-
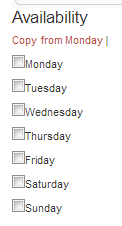
Select the contact (location) you would like to edit the hours for and scroll all the way down (under the Miscellaneous Info block) to the Availability section
-
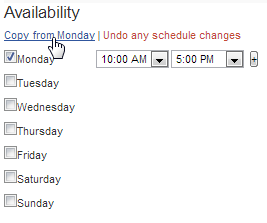
Check the box next to Monday, and set Monday’s store hours
-
To quickly populate the rest of the week, click Copy from Monday
-
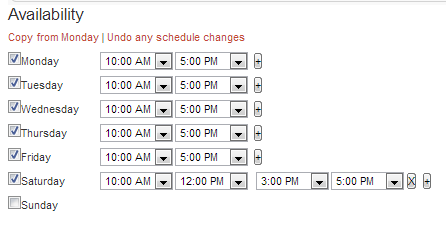
Adjust hours as necessary. If you are closed on a certain day, uncheck the box by that day. You can also set multiple hour blocks per day by using the + button, if you are closed for lunch, for instance.
-
Save your changes

-
Check your work on the front end. (Refresh the page with SHIFT+CTRL+R)
Hours still haven’t updated?
Some sites are set up so the store hours that appear on their site are edited by opening the “Hours” Content Item. If you have a large number of Content Items, you can find “Hours” in the “Store Info” category. Generally, Content > All Content Items > Hours will work fine.
Many stores have separate “items” for Summer Hours, Winter Hours, Normal Hours, etc, and simply publish the appropriate one. You can set that up yourself by copying the old Hours into a new Content Item, changing the relevant times, and saving with the new name.
If your hours are in a “Module,” or built into a graphic, please email support@stoysnet.com, or your project manager with the new hours, and we’ll update it for you.
Updating your Hours in a Content Item
To change your hours (seasonally, for instance), follow these steps.
-
Open up the Store Info Content Items

-
Open the relevant item: Location, Hours, or similar.

-
Change the information. To keep the same line spacing you may need to use a ‘soft return (SHIFT+ENTER),’ or change the Format to “Div.”
-
Save your changes
-
Check your work on the front end. (Refresh the page with SHIFT+CTRL+R)