|
|
Video: Store Configuration |
|
In addition to setting up the Contact page, your shopping cart system has a special set of contact information called the ‘Store Information’. The Store Information is used for assembling and managing orders.
In your Control Panel, click on the Shopping Cart icon to go to your Shopping Cart management panel. |
|
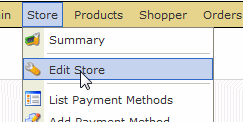
Once in the Shopping Cart section, go to Store >> Edit Store to manage your store information. |
|
|
|
One important item on this page is the “Email:” field in the contact information box. This is the email address that will receive the notice that there has been a sale on the website. We recommend that you use an email address that uses your domain name for professionalism and customer confidence (e.g. orders@yourdomain.com) Alert!: Make sure this address is an active account that you are monitoring. We recommend you send yourself a test email to the address you enter in this field. |
|
The next item is “Minimum Amount for Free Shipping.” This is a level for Global Free Shipping (example: 50 means Free Shipping when the customer checks out with $50 or more (before tax). Set to 0 for no Global Free Shipping. This Global Free Shipping overrides any other shipping calculator costs. |
|
Further down the page, you will find a field where you can create a description for your store or cart system. |
|
|
The next text box area is the “Terms of Service” description which is only used if you have the cart configured to make shoppers agree to your terms of service. These terms of service could be used for returns policies or other similar informaton. More about the various Terms of Service options.
|
|
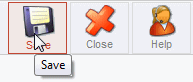
SAVING. After you make any changes, press the “Save” button at the top right to apply the changes.
|