This page tells you all about Authorize.net: how to sign up for an Authorize.net account; how to configure the Authorize.net payment processor; and at the bottom of the page, we supply some additional links to the Authorize.net help pages. Step 1. Sign up for an Authorize.net account |
1. Sign up for an Authorize.net account |
 |
2. Activate your Authorize.Net accountYou will need to activate your new Authorize.net account. Please follow the instructions that come with your welcome email from Authorize.net. (for more assistance, see the Authorize.net Support Center: Authorize.Net Account Activation Guide) |
3. Generate Your API Login ID and Transaction KeyTo connect your Website to the Authorize.net payment gateway, you must first generate your API Login ID and Transaction Key from your Authorize.net account, and then enter both codes in your website Payment Processor. For assistance in generating your API Login ID and Transaction Key, see the Authorize.net Support Center: How do I obtain my API Login ID and Transaction Key? ). |
4. Configure the Authorize.net Payment ProcessorAfter you have generated your API Login ID and Transaction Key, you will need to setup the Payment Processor on your STN website. To do this, Login to your website Administration (back-end), and go to the Shopping Cart >> Store >> List Payment Methods. |
Here you will see the list of Payment Processors (also called Payment Method Types): |
Look for the Payment Method with the Code “AUT”, then click on the red name “Credit Card” name to open it. This will display the configuration options for the Authorize.net Payment Processor. There are 2 tabs that you will need to setup, the “General”and “Configuration”. |
General TabOn the “General” tab you should only need to update these three settings: 1. Activate the payment processor 2. Change the “Payment Method Name”. This text is what is displayed to the consumer during the checkout process. The most common name used is simply “Credit Card“. 3. Select the Credit Card Types that you will accept with your Authorize.net account. (note: Your Authorize.net account MUST be enabled for each of the cards you select here! Refer to the Authorize.net support site for help in adding or enabling new card types: ) |
|
Configuration TabOn the “Configuration” tab, you will need check several settings, as well as enter your API Login ID and Transaction Key from your Authorize.net account. Below is an explanation of each setting: Test Mode. Select ‘Yes’ while testing. When you are ready to run transactions for real, you will want to set test mode to ‘No’. |
| Authorize.net Login ID. Enter Authorize.net Login ID from your Authorize.net account (or as provided by your Authorize.net representative). |
Authorize.net Transaction Key. Note: Please follow these instructions carefully. Many people are confused by the extra security steps required to set this Key.
|
|
|
Request Credit Card CVV Code. You will next need to decide if you are going to require that the shopper enter their credit card security code, or “Card Verification Value” code. At STN we recommend this, and most gateway and merchant accounts require the CVV code. |
| Recurring Billings. In most cases, you will set “Recurring Billings” to ‘No’. You would only set this to ‘Yes’ for charging the customer Recurring Billings such as monthly membership payments. |
| Authentication Type. Here you have the option to tell Authoriz.net to either ‘authorize and charge‘ (AUTH_CAPTURE) the credit card. or to ‘only authorize‘ (AUTH_ONLY) the credit card. With AUTH_ONLY, you can still charge the credit cards from within your Authorize.net Administration Account. |
| Order Status Options. You have the option to assign a specific status to successful and failed transactions. |
Show Response Codes for Failed Transactions. If set to ‘YES’, the customer will see the Authorize.net Transaction Response Codes for failed transactions. This setting can be helpful in testing the gateway if you experience problems in sending card transactions to Authorize.net. Here is the response code reason lookup page: Authorize.Net Response Codes Also from experience we see most issues caused by AVS (Address Verification Service) or the Fraud Detection filters. Please take care in setting those up. |
| Email Confirmation from Gateway. These last 2 items have to do with emails being sent by Authorize.net (These settings do not affect the emails that are sent by your website’s shopping cart system). If you want an email to be sent by Authorize.net to you, the retailer, then set the first option to ‘Yes’. If you want Authorize.net to send an email to the shopper, then set the second one to ‘Yes’. |
| Save and Check Activation States. Of course, Click the ‘Save’ button after making your changes – and be sure that this payment processor is set to “Active” and any other payment processors that you do not want to use are set to “Not Active” (Unpublished). |
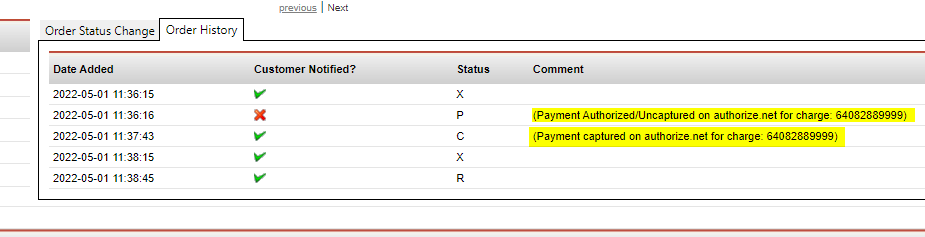
5. Authorize Only vs. Authorize & CaptureIf you set your website module to AUTH_ONLY, your customer’s card is authorized for the charge, but is not charged until you trigger a Capture command. Changing the order status for an order can trigger this action within your Authorize.net account. see below.
|