A “QuickBooks QWC authorization file” is a special file that allows the QuickBooks Web Connector to communicate with your website. You will need to create and install at least one QuickBooks QWC authorization file (you can use multiple QuickBooks QWC authorization files if you wish).
Steps for creating a QuickBooks QWC authorization file:
-
Login to your website Administration Panel
-
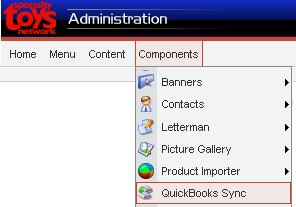
From the Components Menu, select QuickBooks Sync

-
Click the New button

-
Enter a Username and Password.
Your Password is case sensitive! Copy and save your password to use later – you will need to enter the password again when adding the QWC file to the QuickBooks Web Connector application.
-
Enter in your computer’s full name, without the period. * To discover the full name of your computer: Open System by clicking the Start button
 , clicking Control Panel, clicking System and Maintenance, and then clicking System. Under Computer name, domain, and workgroup settings, you can find your computer’s name, and it’s full computer name if your computer is on a domain. Click here for more help on finding your Computer’s Full Name.
*note: if running into connection errors, enter your computer’s name in lowercase characters only.
-
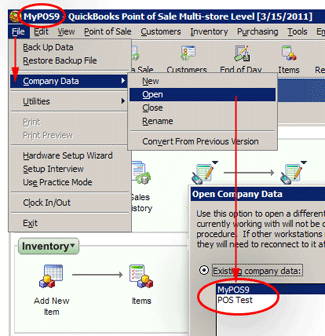
Enter the Company Name that is used in QuickBooks. * You may have multiple Company Data files… enter the name of the QuickBooks POS company file that you want to connect to. You can find the Company Name in the top-left corner of QuickBooks POS, or in File > Company Data > Open > Company Data List.
*note: if running into connection errors, enter your QuickBooks company file name in lowercase characters only.

-
Select the version of QuickBooks that you are running.
(We currently support versions 8, 9 and 10.) -
In the Data Settings block, you can set options for what data is pushed during the sync.
-
Check “Push Up Product Inventory” if you wish to sync inventory
-
Check “Push Up Product Prices” if you wish to sync prices.
-
You can select which QuickBooks POS field to use for pricing.
-
You can select which QuickBooks POS field to use for identifying products. Your selected POS field data MUST MATCH EXACTLY with the website’s “product SKU” field data in order to sync correctly.
for example, these items will sync: POS Item Number > Website Product SKU Status aa1234 aa1234 good item 444 item 444 good …and these items will NOT sync: POS Item Number > Website Product SKU Status aa1234 aa123-4 bad (dash) item 444 item444 bad (space before “444”) b567 b567 bad (trailing space in POS Item Number, “b567 “)
-
-
Click Save

-
Your next step will be to Download and Install your QWC Authorization file
