|
This page will go over the steps needed to update Safety Warnings using the CSV Import/Export tools. Notes: If you already have a CSV file with alerts, please see this help page: Import Warnings via CSV . To do this you will need a program on your computer to edit CSV files. We recommend Microsoft Excel or OpenOffice Calc (http://www.openoffice.org/ ) OpenOffice is a free open-source spreadsheet program that is available for Mac and PC.
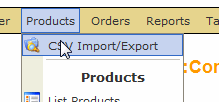
Step 1. To get started you will need to be logged into the Administrator back-end and be in the shopping cart. In the shopping cart menu go to Products >> CSV Import/Export. |
|
Step 2. We’re going to Export a list of the products in our web cart, so first we’ll want to make sure our CSV is Configured with the needed fields. This is under the Configuration tab: |
|
|
|
For our purposes, we’ll want to export at least these fields:
product_sku <————— required So if these items aren’t already in the custom configuration, you’ll need to update the Configuration tab. (see also, editing CSV Field Configurations ) |
|
|
|
Step 3. Then we’ll export the CSV file.
|
|
Note! It is Highly Recommended that you first Export and save a backup copy of your cart data before importing changes with the CSV Importer – especially if CSV Importing/Exporting is a new process for you. We recommend using these settings below to Export a complete product record. Save this file to your local hard-drive, and if needed, an STN rep can use it to restore your cart. |
|
|
|
Then we’ll export another CSV file using these settings below: |
|
|
|
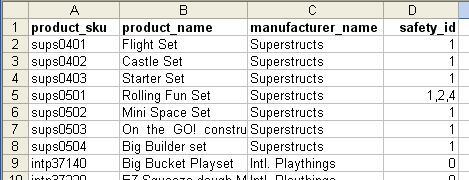
The above settings are intended for use with the earlier noted configuration fields. Step 4. Save the CSV file as and open it within Excel or other spreadsheet program. Step 5. Enter the desired warnings for each product. Add your Safety Warnings in the safety_id field, using this format:
1,2,3,4,5,6 <—————- (this will display all 6 alerts for the product) |
|
|
|
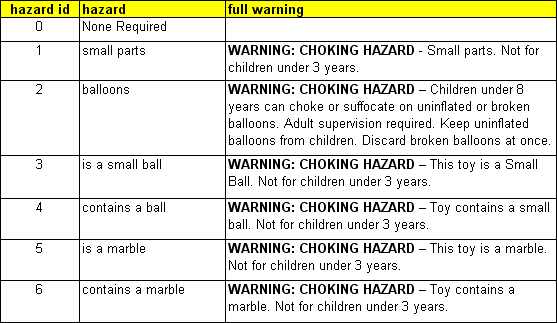
Note: these are the alerts by number: |
|
|
|
6) Save the document as a CSV file |
|
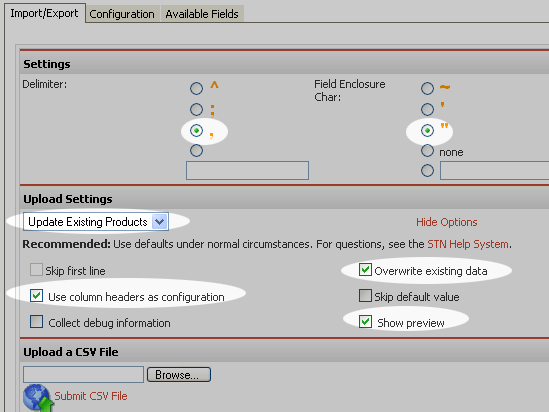
7) Import the new CSV file Use these settings: |
|
|
|
Using the “Update Existing Products” in the Upload Settings will ensure that the system will not create new products in your cart system. Any SKUs that do not match existing SKUs will automatically be skipped during the upload. Then click the Browse button to select the new CSV file, |
|
|
|
and then click the “Submit CSV File” link. |
|
|
|
8) In the preview, you should see all your columns, with the first 5 rows of data from the file. If the data is lining up correctly, click “Continue upload”. If not, click “Cancel upload” and check the CSV file. |
|
|
|
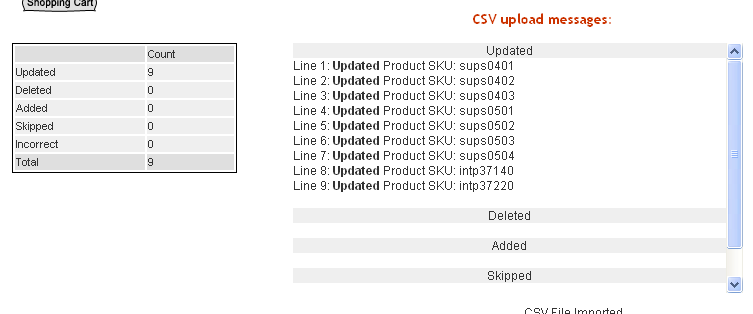
9) When the system has completed the upload, the report screen will be displayed. |
|
|
|
In this scenario, only items with matching SKUs will be updated. Note: In the report, if you see Skipped items, it may be because you have SKUs with leading zeros. |
|
Hint: Avoid leading zeros when creating SKUs Here’s an example of a product with a poor SKU: “0054321”. The problem with SKUs that have leading zeros is that when using the CSV import/export functionality, most spreadsheet programs (e.g. Excel) will strip out the leading zeros automatically as part of their standard formatting rules. So, if you try and import that same item, it will now show up as a new product, with SKU “54321”. Or even worse, you may already have a product with the shorter SKU, so the import will overwrite the existing product with bad information.
Better SKUs to use: |
|
|

